You can hide a passerby’s face, a parked car’s license plate or a name on a door by pixelating or blurring just that part of the frame. In FFmpeg you cut the area out with crop, process it, and put it back in the same place with overlay.
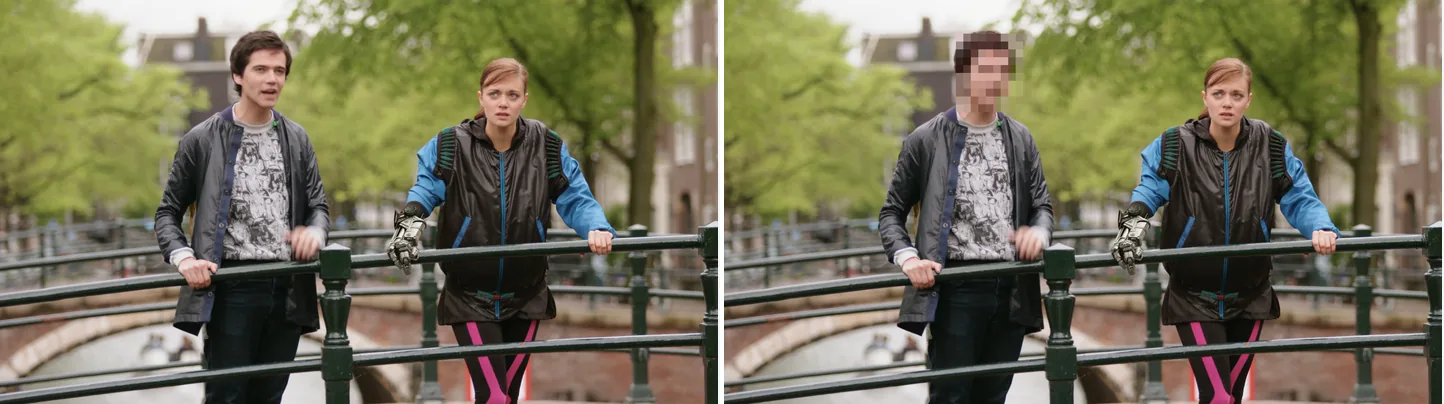
Left is the original. On the right only the face is pixelated, in four steps: crop, scale down, scale back up with flags=neighbor, then overlay.
Source: Tears of Steel (CC) Blender Foundation | mango.blender.org, CC BY 3.0. One frame of the film, processed with the filter shown.
Mosaic vs Blur — Which to Choose
A mosaic (pixelation) and a blur are different operations. The table compares them.
| Method | Mechanism | Privacy Strength | Time | Look |
|---|---|---|---|---|
| Mosaic (pixelize) | scale down then up, or pixelize |
Medium (stronger with larger blocks) | 0.40 s (scale), 0.36 s (pixelize) |
Hard pixel blocks |
| boxblur | Box-kernel averaging | Medium (depends on strength) | 2.21 s (boxblur=10) |
Uniform soft focus |
| gblur | Gaussian distribution | Medium | 0.62 s (gblur=sigma=20) |
Smooth, natural |
| avgblur | Plain averaging | Medium | 0.57 s (avgblur=sizeX=10) |
Slightly coarser |
Time is how long each filter took on the whole frame of 300 uncompressed 1080p frames, with output to -f null (Core i9-14900KF / FFmpeg 8.1, median of 5 runs; 0.34 s with no filter; mosaic blocks of 10 px). When you process only a small region, the choice makes almost no difference to the time.
Which one to use:
- Faces, license plates, addresses and anything else that must not be seen at all: cover it with an opaque fill (drawbox with
t=fill) - Background figures and objects that only need to stand out less: mosaic or blur (
boxblur/gblur)
Mosaic and blur both keep traces of the original colours, and pixelated text has been read back. If something must not be read, fill it.
Mosaic a Single Static Region (Pixelize)
Use this for a face or a plate that stays in one place on screen.
Method 1 — scale down then scale up
ffmpeg -i input.mp4 -filter_complex "[0:v]crop=80:60:100:80,scale=10:8,scale=80:60:flags=neighbor[fg];[0:v][fg]overlay=100:80[out]" -map "[out]" output.mp4What each step does:
crop=80:60:100:80— cut out an 80×60 area whose top-left corner is at (100, 80)scale=10:8— shrink it to 10×8 (this is where the detail is lost)scale=80:60:flags=neighbor— scale it back up with nearest-neighbor scaling, which gives sharp-edged blocksoverlay=100:80— paste it back over the original at the same position
For bigger blocks, shrink further, for example to scale=5:4. The bigger the blocks, the harder it is to guess the original.
Method 2 — the pixelize filter (FFmpeg 5.1+)
ffmpeg -i input.mp4 -filter_complex "[0:v]crop=80:60:100:80,pixelize=w=10:h=10[fg];[0:v][fg]overlay=100:80[out]" -map "[out]" output.mp4pixelize is a filter made for mosaics. w and h set the width and height of each block in pixels.
Gaussian Blur a Static Region
A Gaussian blur (gblur) looks soft and natural, which suits videos for streaming.
The crop + overlay sandwich pattern
ffmpeg -i input.mp4 -filter_complex "[0:v]crop=80:60:100:80,gblur=sigma=20[fg];[0:v][fg]overlay=100:80[out]" -map "[out]" output.mp4As a diagram, the “sandwich” looks like this:
        Source [0:v]
         │
         ├─────────────► used as the base layer
         │
         └─► crop ─► gblur ─► [fg] ──┐
                                      ▼
                          overlay at the same coordinates
                                      │
                                      ▼
                                   [out] result
There is only one input. The filtergraph uses [0:v] twice: once as the base and once for the part that is cut out. You do not need split; referring to the same input twice is enough.
The boxblur version
ffmpeg -i input.mp4 -filter_complex "[0:v]crop=80:60:100:80,boxblur=10[fg];[0:v][fg]overlay=100:80[out]" -map "[out]" output.mp4boxblur works in place of gblur. For setting its strength, see the boxblur article.
Hiding Multiple Regions Simultaneously
To hide several faces or cars in one pass, chain overlay filters.
ffmpeg -i input.mp4 -filter_complex "[0:v]crop=60:50:40:40,boxblur=10[a];[0:v][a]overlay=40:40[v1];[0:v]crop=60:50:200:140,boxblur=10[b];[v1][b]overlay=200:140[out]" -map "[out]" output.mp4Step by step:
- Region A (top-left):
crop→ blur →overlayonto the original; the result is labeled[v1] - Region B (bottom-right):
crop→ blur →overlayonto[v1] - The final result is
[out]
For 3, 4 or more regions, keep adding intermediate labels: [v1]→[v2]→[v3]→...→[out].
When the Region Moves Over Time
A walking person or a moving car does not stay in one place. Use t (time in seconds) in the position expressions so that the area moves with the subject.
Constant horizontal motion
ffmpeg -i input.mp4 -filter_complex "[0:v]crop=60:50:40+t*5:40,boxblur=10[fg];[0:v][fg]overlay=40+t*5:40[out]" -map "[out]" output.mp440+t*5 means “start at X=40 and move 5 px to the right every second”. Use exactly the same expression in crop and in overlay.
Key-frame–style position switching
If the subject jumps to a new position at 5 seconds:
ffmpeg -i input.mp4 -filter_complex "[0:v]crop=60:50:if(lt(t\,5)\,40\,150):40,boxblur=10[fg];[0:v][fg]overlay=if(lt(t\,5)\,40\,150):40[out]" -map "[out]" output.mp4if(lt(t,5),40,150) reads as “if t<5 then 40 else 150”. For three or more segments, nest: if(lt(t,2),A,if(lt(t,5),B,C)). Inside a filter expression, escape commas as \,.
Auto-Tracking Face Blur
Common FFmpeg builds cannot detect faces. To follow a moving face automatically, you need other tools as well:
- Detect the faces with OpenCV, dlib or MediaPipe: in Python, run a detector on each frame and write
(time, x, y, w, h)to a CSV file - Turn the detections into expressions that use
t: oneif(between(t,a,b),x1,...)for each short stretch of time - Blur with FFmpeg, using the same syntax as the key-frame example above
A minimal sketch of the detection step:
# OpenCV face detection -> FFmpeg expression
import cv2
cap = cv2.VideoCapture("input.mp4")
detector = cv2.CascadeClassifier(cv2.data.haarcascades + "haarcascade_frontalface_default.xml")
boxes = []  # (time, x, y, w, h)
fps = cap.get(cv2.CAP_PROP_FPS)
i = 0
while True:
    ok, frame = cap.read()
    if not ok: break
    faces = detector.detectMultiScale(frame, 1.3, 5)
    if len(faces):
        x, y, w, h = faces[0]
        boxes.append((i/fps, x, y, w, h))
    i += 1
# Build the FFmpeg `if()` expression from boxes and pass it to -filter_complex
For real work, replace the Haar cascade with a model that misses fewer faces, such as YOLOv8 or MediaPipe Face Detection.
Time-Limited Blur
To blur only for a set time, for example from 2s to 5s, add enable to overlay.
ffmpeg -i input.mp4 -filter_complex "[0:v]crop=60:50:40:40,boxblur=10[fg];[0:v][fg]overlay=x=40:y=40:enable='between(t,2,5)'[out]" -map "[out]" output.mp4between(t,2,5)— only enable the overlay between 2s and 5s- Outside that time, the original video is shown unchanged
For several time ranges, join them with + (meaning “or”): enable='between(t,2,5)+between(t,10,12)'.
Preserving Output Quality
A blurred area is a smooth gradient, so with some encoder settings it can show banding (visible steps in smooth areas).
Lower the CRF
ffmpeg -i input.mp4 -filter_complex "[0:v]crop=80:60:100:80,boxblur=10[fg];[0:v][fg]overlay=100:80[out]" -map "[out]" -c:v libx264 -crf 18 -pix_fmt yuv420p output.mp4-crf 18 looks almost the same as the source (the default is 23). To keep blurred areas clean, 18–20 is a safe range.
Lock down the pixel format
Always add this to the output options:
-pix_fmt yuv420pThis keeps the file playable almost everywhere. If you keep a 10-bit source at yuv420p10le, libx264 writes the High 10 profile, which some devices cannot play.
Troubleshooting
FFmpeg stops with an error about the label
The cause is a missing -map "[out]", or a -map label that does not match the one in the filtergraph.
# Wrong
ffmpeg -i input.mp4 -filter_complex "[0:v]crop=80:60:100:80,boxblur=10[fg];[0:v][fg]overlay=100:80[result]" output.mp4
The final label [result] is never mapped, so FFmpeg stops with Filter 'overlay:default' has output 0 (result) unconnected and writes no video. Map the final label, for example with -map "[result]". If the -map label has a typo, the error starts with Output with label 'out' does not exist instead.
The crop region runs off the frame
crop stops with “Invalid too big or non positive size” only when W or H is larger than the input. If X+W goes past the input width (or Y+H past the height), there is no error. crop quietly moves the area back inside the frame, but overlay still pastes it at the original position, so a blurred copy of a different area ends up there. Check the resolution with ffprobe -i input.mp4 first.
Processing is extremely slow
boxblurruns on a single thread, so blurring the whole frame with it is slow. Switch togblur; its speed barely changes when you raisesigma- For 4K sources, scale the crop coordinates up to match (a face is usually 200–400 px)
Slight color shift
With an 8-bit yuv420p source, the filters leave every pixel outside the blurred area exactly as it was. With a 10-bit or 4:2:2 source, overlay converts to 8-bit yuv420p by default. To keep the original format, add format=auto, as in overlay=100:80:format=auto.
Quick Comparison — Which Filter to Use
| Filter | Strength control | Time | Resistance to recovery | Best for |
|---|---|---|---|---|
scale,scale (mosaic) |
Shrink size | 0.40 s | Medium (larger blocks → stronger) | Faces, figures |
pixelize |
w, h |
0.36 s | Medium (larger blocks → stronger) | Faces, figures |
boxblur |
luma_radius:luma_power |
2.21 s | Medium | Background, small objects |
gblur |
sigma |
0.62 s | Medium | Polished output |
avgblur |
Kernel size | 0.57 s | Medium | Lightweight batch |
Times come from the same test as the first table (the whole 1080p frame, 300 frames).
FAQ
Q1. The blur looks too weak — how do I make it stronger?
For boxblur, raise both the radius and the power, for example boxblur=15:3 (on an 80×60 region the radius can go up to 15). For gblur, raise sigma, for example gblur=sigma=30. For a mosaic, shrink to a very small size such as 5×4: the smaller the size, the bigger the blocks.
Q2. Is mosaic enough to fully hide personal info?
No. Each mosaic block keeps colour information from the original, and pixelated text has been read back. Blur has the same problem. For text such as addresses and phone numbers, and for faces that must not be recognised, cover the area with an opaque fill, for example drawbox=x=100:y=80:w=80:h=60:color=black:t=fill.
Q3. How do I track a moving subject (person, car)?
Common FFmpeg builds cannot find and track people or cars by themselves. The usual approach is to get the coordinates for each frame with OpenCV, MediaPipe or YOLO, then put them into the key-frame style expression shown above. Python finds the positions and FFmpeg does the blurring.
Q4. FFmpeg stops with an unconnected error
It is almost always a missing -map "[out]". If the last output of -filter_complex has a label such as [out], map that label with -map. If it has no label, FFmpeg uses it without -map.
Q5. How do I blur exactly one frame?
Use n (the frame number): enable='between(n,30,30)'. With time instead: enable='between(t,1.0,1.02)' (at 30 fps only the frame at 1.0 s falls inside).
Q6. Can the blurred area be reverted?
You cannot turn a mosaic or blur back into the original, but the original text or face can sometimes be guessed from it. If you blurred too much by mistake, unsharp can sharpen the area a little but cannot bring back the detail. Always keep the original file.
Related Articles
- boxblur Filter — Box Blur Basics — blurring the whole frame
- Draw Rectangles with drawbox — cover a license plate with a solid fill
- Overlay a Watermark — overlay basics
- Crop Black Bars — crop syntax in detail
Primary source: ffmpeg.org/ffmpeg-filters.html#boxblur