Black bars at the top and bottom of a video, or at the sides of a 4:3 picture inside a widescreen file, can be cut off with the crop filter: -vf crop=W:H:X:Y. The hard part is finding the right numbers. The cropdetect filter measures the bars for you.
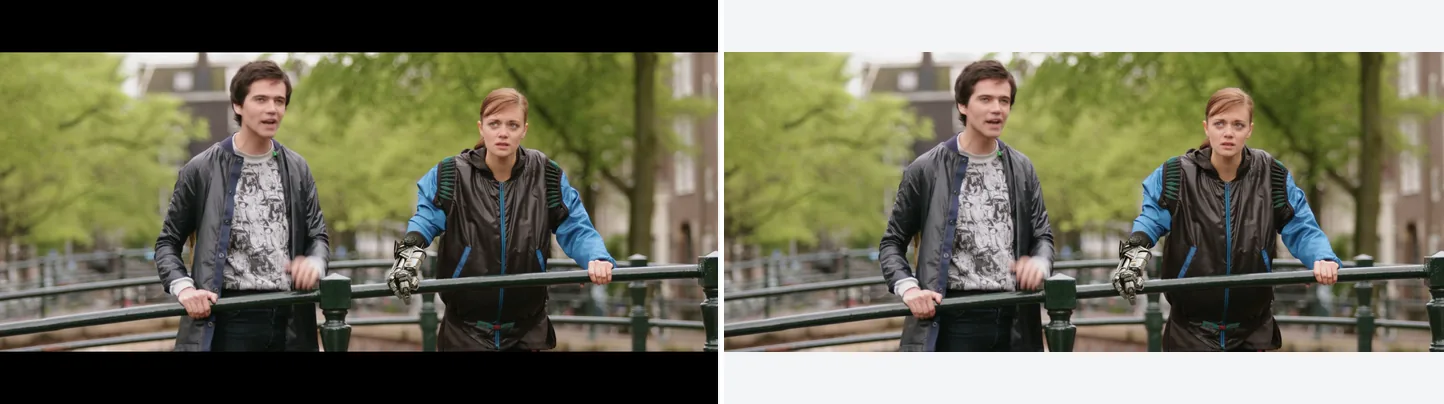
Left is the input with letterbox bars (added for this example), right is after crop=1920:800:0:140.
Source: Tears of Steel (CC) Blender Foundation | mango.blender.org, CC BY 3.0. One frame of the film, processed with the filter shown.
Why Black Bars Appear
| Case | Situation | What you see |
|---|---|---|
| Letterbox | 2.35:1 cinema content on a 16:9 display | Bars on top and bottom |
| Pillarbox | 4:3 (1.33:1) source on a 16:9 display | Bars on left and right |
| Windowbox | 16:9 film letterboxed into 4:3, then shown on a 16:9 display | Bars on all four sides |
| Burned-in bars | Black pixels physically encoded into the file | Real pixel data |
Only the last case needs crop, because there the bars are real pixels in the file. Bars that the player adds to keep the aspect ratio are not part of the file, so there is nothing to remove.
Auto-detect with cropdetect
Basic detection command
ffmpeg -i input.mp4 -vf cropdetect -f null -| Part | Meaning |
|---|---|
-vf cropdetect |
Analyze each frame for black-bar regions |
-f null - |
Write no output file, only analyze |
FFmpeg prints one line per frame, like this:
[Parsed_cropdetect_0 @ 0x...] x1:0 x2:1919 y1:140 y2:939 w:1920 h:800 x:0 y:140 pts:29696 t:1.933333 limit:0.094118 crop=1920:800:0:140Copy the crop=1920:800:0:140 part at the end. That is the value for the next step.
Speed up with a sampled window
Running cropdetect over a whole film is slow. An opening logo that fills the frame also spoils the result: with the default reset=0, the detected area then stays at the full frame until the end. Check a short part from the middle of the video instead:
ffmpeg -ss 60 -i input.mp4 -t 5 -vf cropdetect -f null --ss 60 jumps to the 1-minute mark and -t 5 analyzes only 5 seconds. For most modern videos that is enough to find the picture area.
Tuning limit, round, and reset
cropdetect has three settings worth knowing:
| Argument | Default | Meaning |
|---|---|---|
limit |
24 (8-bit) |
Highest brightness (luma) that still counts as black. Lower is stricter, higher is looser |
round |
16 |
Rounds the detected width and height to a multiple of this. Helps encoder compatibility |
reset |
0 |
Starts the detection over every N frames. Useful when the bars change between scenes |
# round=16 and reset=0 (the defaults) spelled out; limit is left out so its default matches the video's bit depth. Change these numbers to tune
ffmpeg -ss 60 -i input.mp4 -t 5 -vf cropdetect=round=16:reset=0 -f null -
If limit is too high, dark parts of the picture count as black bars. Start with the default 24 and change it only if detection fails. For 10-bit video, give it as a fraction from 0 to 1, such as limit=0.1 (24 is about 0.094).
Apply Detected Values to the crop Filter
Pass the value from cropdetect (for example crop=1920:800:0:140) to -vf. This command uses in_w and in_h instead of fixed numbers, so it runs on any input. For your own video, use the numbers cropdetect gave you.
ffmpeg -i input.mp4 -vf "crop=in_w:in_h-40:0:20" -c:a copy output.mp4| Part | Meaning |
|---|---|
crop=W:H:X:Y |
Cut a W×H rectangle starting at top-left (X, Y) |
in_w / in_h |
Input width / height variables (works without knowing the resolution) |
-c:a copy |
Copy audio without re-encoding (fast, lossless) |
This removes 20 pixels from the top and 20 from the bottom. For a 1920×1080 source with 140-pixel bars, write crop=1920:800:0:140 instead.
cropalways re-encodes the video. If you do not choose a codec, FFmpeg uses the default for the container (libx264 for mp4). To control the quality, set-c:v libx264 -crf 18yourself.
Recommended quality-aware form
ffmpeg -i input.mp4 -vf "crop=in_w:in_h-40:0:20" \
  -c:v libx264 -crf 18 -preset slow \
  -c:a copy output.mp4
-crf 18 is widely considered visually lossless. -preset slow gives a smaller file at the same quality but takes longer to encode, which is worth it for files you archive.
Can I crop without re-encoding?
# Wrong
ffmpeg -i input.mp4 -vf "crop=in_w:in_h-40:0:20" -c copy output.mp4
-c copy copies the stream without decoding it, so it cannot be combined with -vf filters. Filters change the pixels, so the video has to be re-encoded.
H.264 and H.265 have one exception. The h264_metadata bitstream filter (hevc_metadata for H.265) changes the cropping values stored in the stream, so the bars disappear without re-encoding. The new values replace the old ones. A 1080p H.264 stream is normally stored as 1088 lines with 8 cropped at the bottom, so 140-pixel bars need crop_bottom=148:
ffmpeg -i input.mp4 -c copy -bsf:v h264_metadata=crop_top=140:crop_bottom=148 cropped.mp4
ffmpeg -i cropped.mp4 -c copy output.mp4
The second command copies the file once more so that the MP4 header also shows the new size, 1920×800.
Manual Calculation
Work the numbers out yourself when cropdetect gets it wrong (for example on very dark scenes) or when you want a specific aspect ratio.
Letterbox example (top/bottom bars)
A 1920×1080 source with 140-pixel bars at the top and bottom: height = 1080 − 140×2 = 800, Y offset = 140. The general form, for removing N pixels from the top and the bottom:
# Shave 20px off top and bottom (same idea as 1920x1080 → 1920x1040)
ffmpeg -i input.mp4 -vf "crop=in_w:in_h-40:0:20" -c:a copy output.mp4
Pillarbox example (left/right bars)
A 1920×1080 frame with a 4:3 (1440×1080) picture inside and 240-pixel bars on each side: width = 1920 − 240×2 = 1440, X offset = 240. The general form:
# Shave 40px off left and right
ffmpeg -i input.mp4 -vf "crop=in_w-80:in_h:40:0" -c:a copy output.mp4
Center crop (shorthand)
Leave out X and Y to crop from the center:
# Cut a centered 4:3 region from the input (assumes in_h*4/3 <= in_w)
ffmpeg -i input.mp4 -vf "crop=in_h*4/3:in_h" -c:a copy output.mp4
The Even-Dimensions Trap and Fix
H.264 and H.265 in the yuv420p pixel format, the one most players support, need a width and height that are multiples of 2. Otherwise encoding fails:
[libx264 @ 0x...] height not divisible by 2 (1920x801)
[vost#0:0/libx264 @ 0x...] [enc:libx264 @ 0x...] Error while opening encoder - maybe incorrect parameters such as bit_rate, rate, width or height.
cropdetect avoids this with its round setting (default 16; any even value such as 2 also works). With a yuv420p source, crop also rounds an odd width or height down by itself: crop=1920:801:0:140 gives 1920×800. The error appears when an odd size comes from somewhere else, for example scale with -1, or crop with exact=1.
Fix 1: force even with arithmetic
# floor(W/2)*2 forces an even result
ffmpeg -i input.mp4 -vf "crop=floor(in_w/2)*2:floor(in_h/2)*2" -c:a copy output.mp4
in_w and in_h are the input width and height. floor(x/2)*2 subtracts 1 from an odd value and leaves an even value as it is, so you can reuse it in any script.
Fix 2: relax the yuv420p requirement
yuv444p allows an odd width and height (yuv422p only an odd height), but far fewer TVs, phones and other devices can play them.
# Convert to yuv444p first; on yuv420p, crop rounds odd sizes down
ffmpeg -i input.mp4 -vf "format=yuv444p,crop=in_w-1:in_h-1:0:0" \
  -c:v libx264 -pix_fmt yuv444p -c:a copy output.mp4
For videos you share, keep yuv420p and even dimensions.
When Bars Aren’t Pure Black
In noisy or heavily compressed video, the bars can be almost black, for example (16, 16, 16) or (24, 24, 24) instead of pure (0, 0, 0). The default limit=24 may miss them.
# Loosen the limit to 0.25 (the fraction that equals 64 in 8-bit)
ffmpeg -ss 60 -i input.mp4 -t 5 -vf cropdetect=0.25:2:0 -f null -
The three values are limit:round:reset, in that order. A limit that is too high also cuts into dark parts of the picture, so look at the detected area before you encode:
# Preview the detected crop without re-encoding
ffplay -vf "crop=1920:800:0:140" input.mp4
Without ffplay, encode a 5-second test clip and watch it before you process the whole file.
Adding Black Bars Instead (pad)
When a video must fill a fixed frame such as 1920×1080, add the bars yourself with pad instead of cutting the picture. YouTube does not need this: its player adapts to the video’s aspect ratio, and YouTube advises against adding bars yourself.
4:3 → 16:9 with pillarboxes
ffmpeg -i input.mp4 -vf "scale=1920:1080:force_original_aspect_ratio=decrease,pad=1920:1080:(ow-iw)/2:(oh-ih)/2:black" -c:a copy output.mp4| Part | Meaning |
|---|---|
scale=...:force_original_aspect_ratio=decrease |
Scale to the largest size that fits in 1920×1080 without changing the shape (4:3 becomes 1440×1080) |
pad=1920:1080:(ow-iw)/2:(oh-ih)/2:black |
Center the scaled frame inside a 1920×1080 black canvas |
(ow-iw)/2 means (output width − input width) divided by 2. That is the X offset that puts the picture in the center.
Vertical → 16:9 with pillarboxes
To turn a 1080×1920 phone clip into a 1920×1080 video with pillarboxes:
ffmpeg -i input.mp4 -vf "scale=-2:1080,pad=1920:1080:(ow-iw)/2:0:black" -c:a copy output.mp4The clip is scaled to a height of 1080, then padded at the sides to a width of 1920.
Pad with a non-black color
ffmpeg -i input.mp4 -vf "pad=1920:1080:(ow-iw)/2:(oh-ih)/2:white" -c:a copy output.mp4The last pad value is the color. Color names (white, red) and hex values such as 0xRRGGBB both work.
Batch Processing Script
To apply the same crop to many files:
for f in *.mp4; do
  ffmpeg -nostdin -i "$f" -vf "crop=1920:800:0:140" -c:v libx264 -crf 20 -c:a copy "cropped_${f}" -y
done
To detect the bars separately for each file (each may have a different bar size):
for f in *.mp4; do
  CROP=$(ffmpeg -ss 60 -i "$f" -t 3 -vf cropdetect -f null - 2>&1 | \
    grep -oE 'crop=[0-9:]+' | tail -1)
  ffmpeg -nostdin -i "$f" -vf "$CROP" -c:v libx264 -crf 20 -c:a copy "cropped_${f}" -y
done
grep -oE 'crop=[0-9:]+' | tail -1 keeps only the last detected value. With the default reset=0, the detected area only grows, so the last value is the largest area found in the analyzed part.
FAQ
Q1. Why does cropping lower the quality?
A. crop changes the pixels, so the video must be re-encoded, and the quality then depends on your encoder settings. For archiving, use -c:v libx264 -crf 18 (visually lossless) or a lower CRF. -c copy cannot be combined with -vf filters.
Q2. The bars change size between scenes. What now?
A. Set reset=N in cropdetect (for example cropdetect=reset=30) so the detection starts over every N frames. Pick the largest detected rectangle so no scene loses part of its picture; scenes with bigger bars keep a thin black strip. If the scenes differ a lot, split the file where they change and crop each part separately.
Q3. I want to pad a vertical phone clip into a 16:9 frame.
A. Use scale=-2:1080,pad=1920:1080:(ow-iw)/2:0:black from the “Vertical → 16:9 with pillarboxes” section. It centers the vertical clip in a horizontal frame with black sides.
Q4. Should crop come before or after scale in the filter chain?
A. Usually crop first, then scale. Cropping first leaves fewer pixels to scale, which is faster and avoids scaling artifacts from the areas you remove. Example: -vf "crop=1920:800:0:140,scale=1280:-2".
Q5. I get width not divisible by 2 errors.
A. yuv420p does not accept odd dimensions. If the odd size comes from scale, use -2 instead of -1. If it comes from crop, take one pixel off the odd value, or use crop=floor(in_w/2)*2:floor(in_h/2)*2 to force even sizes. With cropdetect’s default round=16, the problem does not come up.
Q6. The cropdetect value keeps changing.
A. With the default reset=0, the detected area only grows. In dark scenes, dark parts of the picture count as black, so the area starts too small and grows when brighter frames appear. Use -ss and -t to check a typical bright section (a daylight scene, for example) and use the last value for the whole file.
Related Articles
- Resize Video — scale Filter Guide
- Video Format Conversion — MP4 / MOV / WebM
- FFmpeg Command Basic Syntax
Primary source: ffmpeg.org/ffmpeg-filters.html#crop / ffmpeg.org/ffmpeg-filters.html#cropdetect / ffmpeg.org/ffmpeg-filters.html#pad