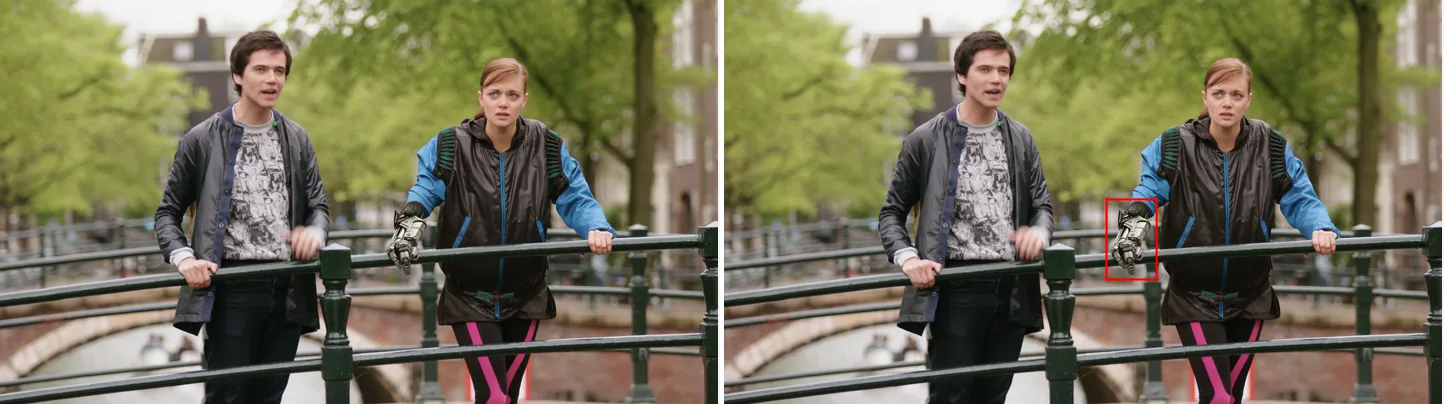
Left is the original. Right is drawbox=x=1020:y=530:w=140:h=220:[email protected]:t=6: the box appears at exactly the position and size given.
Source: Tears of Steel (CC) Blender Foundation | mango.blender.org, CC BY 3.0. One frame of the film, processed with the filter shown.
Basic Commands
Draw a Red Rectangle (Outline Only)
ffmpeg -i input.mp4 \
  -vf "drawbox=x=50:y=50:w=200:h=100:color=red:t=3" \
  output.mp4
x and y set the top-left corner of the box, and w and h its width and height. t=3 is the line width in pixels.
Filled Rectangle
ffmpeg -i input.mp4 \
  -vf "drawbox=x=50:y=50:w=200:h=100:[email protected]:t=fill" \
  output.mp4
t=fill fills the box. Adding @ and an opacity to the color, as in [email protected], makes it semi-transparent. To blur the area instead of covering it, use a box blur.
Parameter Details
| Parameter | Description | Example |
|---|---|---|
x |
Top-left X coordinate | x=50 |
y |
Top-left Y coordinate | y=50 |
w |
Width (use iw for the input width) |
w=200 |
h |
Height (use ih for the input height) |
h=100 |
color |
Color (name or HEX, @opacity allowed) |
[email protected] |
t |
Line width in pixels, or fill |
t=3 / t=fill |
How to Specify Colors
# Specify by color name
ffmpeg -i input.mp4 -vf "drawbox=x=10:y=10:w=100:h=50:color=green:t=2" output.mp4

# Specify by HEX
ffmpeg -i input.mp4 -vf "drawbox=x=10:y=10:w=100:h=50:color=0xFF0000:t=2" output.mp4

# Specify as semi-transparent
ffmpeg -i input.mp4 -vf "drawbox=x=10:y=10:w=100:h=50:[email protected]:t=fill" output.mp4
Draw a Border Around the Entire Frame
ffmpeg -i input.mp4 \
  -vf "drawbox=x=0:y=0:w=iw:h=ih:color=yellow:t=5" \
  output.mp4
iw (input width) and ih (input height) make the border match the video size. To cut out the subject and put it on a different background, use green-screen compositing with chromakey.
Draw Crosshairs in the Center
ffmpeg -i input.mp4 \
  -vf "drawbox=x=iw/2-1:y=0:w=2:h=ih:color=white:t=fill, \
       drawbox=x=0:y=ih/2-1:w=iw:h=2:color=white:t=fill" \
  output.mp4
Two thin filled boxes, one vertical and one horizontal, form the crosshairs.
Draw Multiple Rectangles
ffmpeg -i input.mp4 \
  -vf "drawbox=x=20:y=20:w=150:h=80:color=red:t=3, \
       drawbox=x=200:y=100:w=120:h=60:color=blue:t=3" \
  output.mp4
Join several drawbox filters with commas (,) to draw several boxes.
Overlay a Grid with the drawgrid Filter
drawgrid draws an evenly spaced grid.
ffmpeg -i input.mp4 \
  -vf "drawgrid=width=100:height=100:thickness=1:[email protected]" \
output.mp4| Parameter | Description |
|---|---|
width |
Grid cell width |
height |
Grid cell height |
thickness |
Grid line thickness |
color |
Grid line color |
Draw Rule-of-Thirds Composition Guidelines
ffmpeg -i input.mp4 \
  -vf "drawgrid=width=iw/3:height=ih/3:thickness=1:[email protected]" \
  output.mp4
Setting each cell to a third of the width and height splits the frame into three rows and three columns. Use it to check composition, or as a guide while editing.
Combine with drawtext for a Labeled Bounding Box
ffmpeg -i input.mp4 \
  -vf "drawbox=x=100:y=80:w=200:h=120:color=lime:t=2, \
       drawtext=text='Object':x=102:y=60:fontsize=20:fontcolor=lime" \
  output.mp4
A bounding box is the box drawn around an object, for example one found by object detection. drawtext writes a label just above it, so you can see what the box marks.
Display Only Within a Specific Time Range
Put a time condition in enable to show the box only during that time.
ffmpeg -i input.mp4 \
  -vf "drawbox=x=50:y=50:w=200:h=100:color=red:t=3:enable='between(t,2,5)'" \
  output.mp4
enable='between(t,2,5)' shows the box only from 2 to 5 seconds. t is the playback time in seconds.
Notes
x,y,wandhaccept expressions that useiwandih(the input width and height).- Adding
@valuetocolormakes it semi-transparent. This works for fills (t=fill) and for outlines.
Measured: time and size
The measured command draws three boxes (red, yellow and cyan) on a two-minute 1080p/30fps source.
ffmpeg -i input.mp4 -vf drawbox=x=100:y=100:w=300:h=200:color=red:t=4,drawbox=x=500:y=300:w=300:h=200:color=yellow:t=4,drawbox=x=900:y=500:w=300:h=200:color=cyan:t=4 -c:v libx264 -crf 23 -preset medium -an output.mp4| Metric | Measured |
|---|---|
| Time | 31.68 s (3.79x realtime) |
| Output size | 87.94 MB |
| vs. re-encode with no filter | +1.9% |
Rig: Intel Core i9-14900KF (32 threads), FFmpeg 8.1 (gyan.dev full build), source Big Buck Bunny 1920x1080 / 30fps / 120 s / 351.4 MB (© Blender Foundation, CC BY 3.0), measured 2026-09-05, one run at a time. The raw numbers are in the dataset.
Why the number looks like this
Re-encoding the same source with no filter takes 27.97 s, so most of the 31.68 s is the H.264 encoder, not drawbox. The filter only changes the pixels on the box outlines (t=4), which is very little work. In the same run, boxblur took 59.37 s, colour correction (colorbalance + eq) 53.29 s and curves 42.01 s. The blur averages neighbouring pixels. The other two use RGB filters (colorbalance, curves), so every frame is converted to RGB and back, and those runs were encoded as 4:4:4 (yuv444p), which takes longer than 4:2:0. A fourth box would still leave most of the time to the encoder.
The output was 87.94 MB, 1.9% larger than the unfiltered re-encode. This run drew three outlines at t=4, not filled boxes. Sharp red, yellow and cyan lines are new high-contrast edges, and the encoder spends extra bits on them.
In the same run, operations that left the video stream alone were almost instant: remapping streams took 0.41 s, moving the moov atom 0.49 s, an audio fade 1.03 s. drawbox took 31.68 s. It rewrites pixels, so -c copy (copying without re-encoding) cannot be used. Even one box means re-encoding the whole video.
While you work out the position, render only the first 10 seconds with -t 10. Once the box is in the right place, run the whole file.
Common Pitfalls
-
You wanted a semi-transparent fill but get only an outline.
t=fillis missing, ortis still a number (an outline). Withoutt, drawbox draws a 3-pixel outline. Set both, for example[email protected]:t=fill. -
The box runs off the frame or lands in the wrong place. Fixed
x/ynumbers were reused on a clip with a different resolution. Write the values withiwandihinstead, so they work at any resolution. A full-frame border isx=0:y=0:w=iw:h=ih, and a center crosshair usesx=iw/2-1. -
The line looks too thick or too thin.
tis in pixels, so the same value looks different at different resolutions. At 1080p,t=3tot=5is a good range. To look the same at 4K, roughly double it (aroundt=8). -
Adding
enable='between(t,2,5)'fails withNo such filter: '2'. The quotes were lost, so the commas inside the expression split the filter chain. Put the whole filter in"..."and the expression in'...'.
FAQ
Q. Can I avoid re-encoding with drawbox?
A. No. The pixels change, so the video is re-encoded. You can keep the audio with -c:a copy. To check the position, export a short sample with -t 10 first.
Q. Does drawing several boxes slow things down a lot?
A. For a few boxes the drawbox cost is tiny; most of the time is the re-encode. Boxes joined with commas are processed one after another.
Q. How do I label a bounding box?
A. Join drawbox and drawtext with a comma. As in the labeled bounding box example above, text placed just above the box is easy to read.
Q. My grid lines are too heavy.
A. thickness=1 is the thinnest line drawgrid draws. Make the color semi-transparent, for example [email protected], to soften the lines without changing the width.
Q. Can a fill completely hide a region?
A. Yes. color=black:t=fill with no opacity hides the video underneath. To blur the area instead of covering it, boxblur looks more natural than a solid fill.