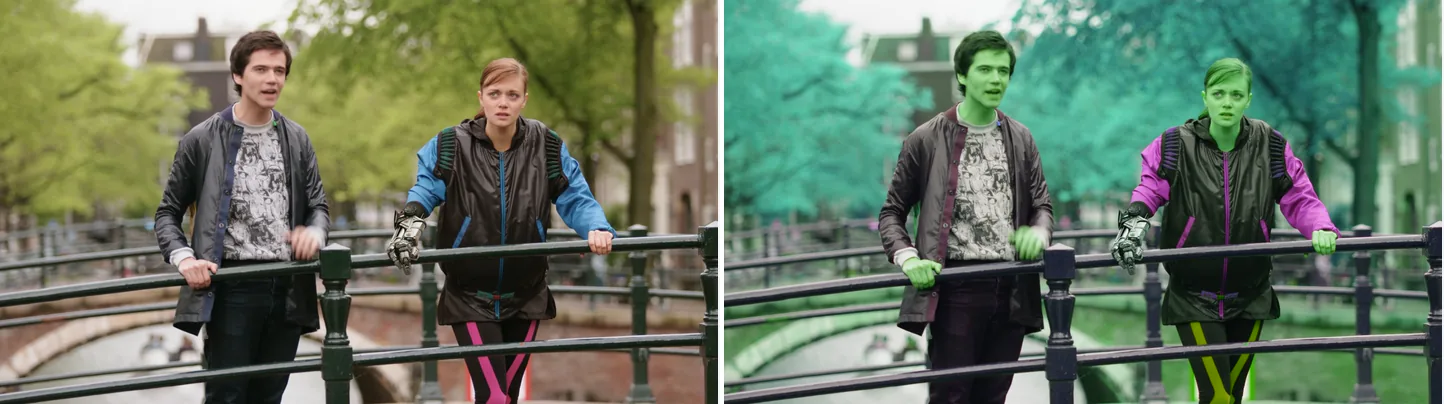
Left is the original. Right is hue=h=100:s=1.2: the hue is rotated by 100 degrees and the saturation multiplied by 1.2. The trees turn teal, skin turns green and the blue sleeves turn purple.
Source: Tears of Steel (CC) Blender Foundation | mango.blender.org, CC BY 3.0. One frame of the film, processed with the filter shown.
Basic Commands
Rotate the Hue
ffmpeg -i input.mp4 -vf "hue=h=90" output.mp4Hue is the kind of color (red, yellow, green, blue and so on), shown as an angle on a color wheel. h=90 shifts every color by 90 degrees. There is no range limit: the angle wraps every 360 degrees, so h=270 gives the same result as h=-90. To give the angle in radians, use H.
Adjust Saturation
ffmpeg -i input.mp4 -vf "hue=s=2.0" output.mp4s multiplies the saturation (how strong the colors are). The default is 1.0. 0 gives grayscale, and 2.0 makes colors more vivid. To adjust color separately in the dark and bright tones, combine it with the curves filter.
Adjust Brightness
ffmpeg -i input.mp4 -vf "hue=b=0.3" output.mp4b is a value added to the brightness. It accepts -10 to 10, and the default is 0. If you also need contrast or gamma, use the eq filter.
Parameter Reference
| Parameter | Description | Default | Range |
|---|---|---|---|
h |
Hue rotation angle (degrees) | 0 |
Any (wraps every 360) |
H |
Hue rotation angle (radians) | 0 |
Any |
s |
Saturation multiplier | 1 |
-10 to 10 |
b |
Brightness offset | 0 |
-10 to 10 |
You cannot set h and H together. Use one of them.
Specifying Multiple Parameters at Once
ffmpeg -i input.mp4 -vf "hue=h=45:s=1.5:b=0.1" output.mp4Separate the settings with colons (:) to set several at once.
Grayscale Conversion
Setting the saturation to 0 gives a grayscale image.
ffmpeg -i input.mp4 -vf "hue=s=0" output.mp4The colorchannelmixer filter can give the same result, but hue=s=0 is the simplest way.
Dynamic Hue Changes (Animated Effects)
hue values can be formulas (FFmpeg expressions), so they can change over time.
ffmpeg -i input.mp4 -vf "hue=h=120*sin(t/5)" output.mp4t is the time of the current frame in seconds. Here the hue swings back and forth in a wave over time.
Applying to Still Images
ffmpeg -i input.jpg -vf "hue=h=180:s=1.2" output.jpgThe same syntax works on still images.
Common Usage Examples
Pushing Yellows and Skin Tones Toward Red
ffmpeg -i input.mp4 -vf "hue=h=-15:s=1.2:b=0.05" output.mp4This rotates the hue slightly in the negative direction and raises the saturation. Yellows and skin tones become redder, reds become pinker and blues move closer to cyan. Whites and greys keep their neutral colour; b=0.05 only makes them slightly brighter.
Inverting the Color (Complementary Color)
ffmpeg -i input.mp4 -vf "hue=h=180" output.mp4Rotating the hue by 180 degrees turns each color into the color opposite it on the wheel (its complementary color).
Things to Note
hueworks in YCbCr (YUV). With RGB input, FFmpeg may convert the format before and afterhue.- A large saturation (
s) value clips the colors: they hit their maximum and fine shades are lost. b(brightness) adds a value; it does not multiply. For contrast or gamma, use theeqfilter.
Measured: time and size
The numbers below come from this command:
ffmpeg -i input.mp4 -vf hue=h=30:s=1.2 -c:v libx264 -crf 23 -preset medium -an output.mp4| Metric | Measured |
|---|---|
| Wall-clock time | 27.06 s (4.44x realtime) |
| Output size | 88.97 MB |
| Size vs. an unfiltered re-encode | +3.1% |
Rig: Intel Core i9-14900KF (32 threads), FFmpeg 8.1 (gyan.dev), source 1920x1080 / 30 fps / 120 s / 351.4 MB (looped Big Buck Bunny, CC BY 3.0). Measured 2026-09-05, one run at a time. The raw numbers are in the dataset.
Why the numbers land where they do
Re-encoding the same source with the same x264 settings and no filter took 27.97 s. With hue=h=30:s=1.2 it took 27.06 s, which is 4.44x faster than real time for the two-minute video. Almost all of that time goes to the encoder. hue only rotates and scales the colour components of each pixel in YCbCr and never looks at neighbouring pixels, so its own cost is hidden behind the encoder.
Not every colour filter is this cheap. In the same run, curves took 42.01 s, a colour-correction chain of colorbalance and eq took 53.29 s, and boxblur, which averages neighbouring pixels, took 59.37 s. curves and colorbalance work in RGB, so every frame is converted to RGB and back, and those runs were encoded as 4:4:4 (yuv444p), which takes longer than the 4:2:0 that hue keeps. hue is at the cheap end.
The output was 88.97 MB, 3.1% larger than the unfiltered re-encode. Rotating the hue by 30 degrees and raising the saturation to 1.2 changes the colour data, and x264 spends slightly more bits on it at the same CRF 23. Both this run and the unfiltered one drop the audio (-an), so the size difference is for video only.
Whether you re-encode matters much more than which filter you use. In the same run, operations that copy the video with -c copy or -c:v copy (no re-encoding) finished in about a second: stream mapping took 0.41 s, moving the moov atom 0.49 s, and an audio fade that re-encodes only the audio 1.03 s. Transcoding to VP9 took 729.16 s. hue rewrites pixels, so it cannot use -c copy, and once you re-encode, 27.06 s is close to the minimum. To save time, do the steps that do not change colour with -c copy. That saves far more than a cheaper filter would.
On real footage with skin, large hue rotations quickly look wrong. For corrections, stay around h=-10 to 10. For a stylised look, start near h=30 and check a short segment. Too much saturation easily clips the red and blue channels, so test anything above s=1.5 on a short sample first.
For plain greyscale, hue=s=0 is convenient. For broadcast work, or when the brightness must be converted accurately, use format and colorspace instead. hue adjusts the look; it does not replace colour management.
For short social clips, check the colour of the frame that becomes the thumbnail. A video can look fine in motion while a single frame shows skin or product colours clearly off. For product reviews, food and makeup videos, a light touch of eq or curves works better than hue. When you mix footage from several cameras, check a short clip from each camera instead of applying one hue value to all of them.
hue does not fix white balance (making white look white). If a white subject looks blue, or indoor light has made everything yellow, rotating the hue breaks the other colours. To correct using whites and greys as the reference, use per-channel RGB curves in curves, or colorbalance.
Related Filters
eq— adjust brightness, contrast, and gammacurves— tone-curve-based color correctioncolorchannelmixer— per-channel color mixingcolorbalance— color adjustment for shadows, midtones, and highlights