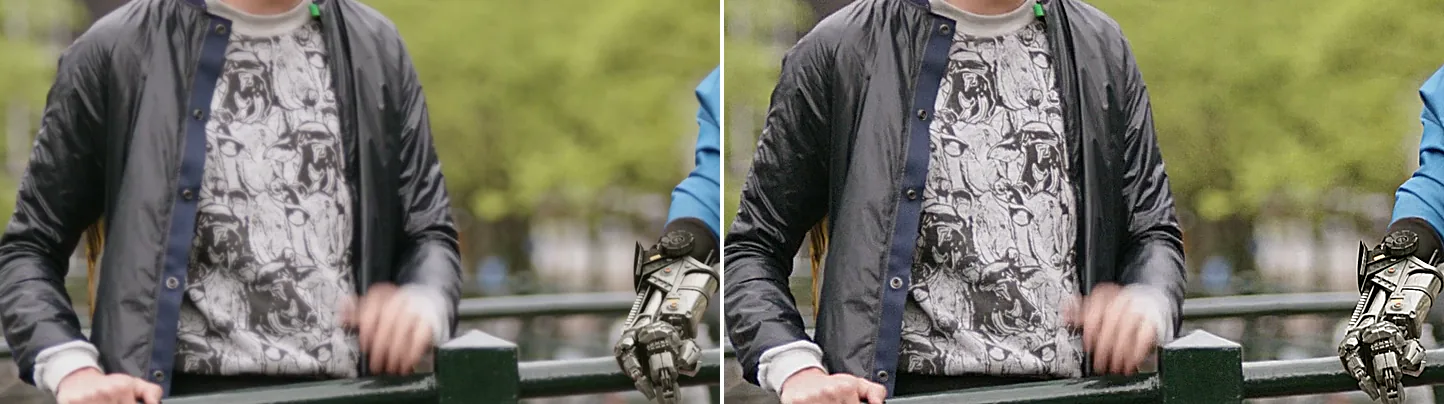
Left is the original, right is unsharp=7:7:2.0:7:7:0.5. Both panels are 1:1 crops, because sharpening disappears when an image is scaled down.
Source: Tears of Steel (CC) Blender Foundation | mango.blender.org, CC BY 3.0. One frame of the film, processed with the filter shown.
Basic Commands
Enhance Sharpness
ffmpeg -i input.mp4 -vf "unsharp=5:5:1.0:5:5:0.0" output.mp4The six values are, in order, lx:ly:la:cx:cy:ca. la is the strength for luma (brightness), and 1.0 sharpens.
Apply a Soft Blur (Use as a Blur)
ffmpeg -i input.mp4 -vf "unsharp=5:5:-1.0:5:5:0.0" output.mp4A negative la blurs instead of sharpening. For a strong, even blur, boxblur is easier to control because its radius can be much larger. It is not faster, though: boxblur runs on a single thread, while unsharp uses several.
Parameter Details
unsharp=lx:ly:la:cx:cy:ca| Parameter | Meaning | Default | Range |
|---|---|---|---|
lx |
Luma matrix width (odd) | 5 |
3–23 |
ly |
Luma matrix height (odd) | 5 |
3–23 |
la |
Luma strength (positive = sharpen, negative = blur) | 1.0 |
-2.0–5.0 |
cx |
Chroma matrix width (odd) | 5 |
3–23 |
cy |
Chroma matrix height (odd) | 5 |
3–23 |
ca |
Chroma strength (positive = sharpen, negative = blur) | 0.0 |
-2.0–5.0 |
The matrix is the block of pixels around each pixel that the filter looks at. Chroma is the color part of the picture. The matrix sizes must be odd numbers (3, 5, 7, 9, …).
Each size can be 3–23 on its own, but each pair has a limit too: lx + ly (and cx + cy) must not be more than 26. 13:13 works; 15:15 fails with luma matrix size (lx/2+ly/2)*2=28 greater than maximum value 25.
Sharpen Luma Only, Leave Chroma Unchanged (Recommended)
ffmpeg -i input.mp4 -vf "unsharp=7:7:1.5:5:5:0.0" output.mp4With ca=0.0 the color is left unchanged. This gives the most natural result. A light luma-only sharpen also helps with the soft edges left after green-screen compositing with chromakey.
Strong Sharpening (For Action Footage)
ffmpeg -i input.mp4 -vf "unsharp=3:3:2.0:3:3:0.0" output.mp4A small matrix with a high strength makes edges stand out and gives a crisp look.
Soft Blur (For Portraits)
ffmpeg -i input.mp4 -vf "unsharp=13:13:-0.5:5:5:0.0" output.mp4A large matrix with a negative strength gives a soft blur.
How the Unsharp Mask Works
The unsharp filter uses the unsharp mask (USM) method:
- Make a blurred copy of the original with a Gaussian blur.
- Subtract the blurred copy from the original. What remains is the edge detail.
- Add that edge detail back to the original, scaled by
la.
A negative la subtracts the edge detail instead, which blurs the picture.
Applying to Still Images
ffmpeg -i input.jpg -vf "unsharp=5:5:1.5:5:5:0.0" output.jpgCommon Settings Compared
| Use Case | Example Command |
|---|---|
| Standard sharpen | unsharp=5:5:1.0:5:5:0.0 |
| Strong sharpen | unsharp=3:3:2.0:3:3:0.0 |
| Light sharpen | unsharp=7:7:0.5:5:5:0.0 |
| Soft blur | unsharp=9:9:-0.5:5:5:0.0 |
| Strong blur | unsharp=13:13:-1.5:5:5:0.0 |
What Not to Do
Bad example: specifying even numbers for the matrix widths
ffmpeg -i input.mp4 -vf "unsharp=6:6:1.0:6:6:0.0" output.mp4
The matrix sizes (lx, ly, cx, cy) must be odd numbers. Even numbers cause an error.
Measured: time and size
The measured command:
ffmpeg -i input.mp4 -vf unsharp=5:5:1.0:5:5:0.0 -c:v libx264 -crf 23 -preset medium -an output.mp4| Metric | Measured |
|---|---|
| Wall-clock time | 32.55 s (3.69x real time) |
| Output size | 140.75 MB |
| Size vs. an unfiltered re-encode | +63.2% |
Test machine: Core i9-14900KF (32 threads), FFmpeg 8.1 (gyan.dev build). Source: 1920x1080, 30 fps, 120 s, 351.4 MB (looped Big Buck Bunny, CC BY 3.0). Run on 2026-09-05, one command at a time. For comparison, a re-encode with no filter (ffmpeg -i input.mp4 -c:v libx264 -crf 23 -preset medium -an output.mp4) took 27.97 s and produced 86.26 MB. Both commands drop the audio, so these are video-only numbers. The raw data is in the dataset.
Where the time goes
32.55 s is only a little more than the 27.97 s for the re-encode with no filter. One 5x5 sharpening pass is cheap; most of the time goes to libx264. For comparison, in the same run boxblur took 59.37 s and a VP9 transcode 729.16 s.
The real cost is the re-encode. In the same run, jobs that could copy the video with -c copy finished in 0.41–0.49 s. Adding unsharp forces a re-encode, which moves the job from under a second to about half a minute. The filter itself is only a small part of that.
Why the file gets larger
The file grew from 86.26 MB to 140.75 MB, +63.2%. Sharpening strengthens fine detail, both edges and grain. CRF (x264’s constant-quality mode) keeps the quality steady and lets the bitrate go up or down as needed. At CRF 23, x264 spends more bits to keep all that extra detail.
So unsharp does not make a video look better at the same file size. If the size has to stay the same, lower la or raise the CRF. The lower your target bitrate, the worse this trade-off gets.
A negative la blurs and removes detail instead, so it should make the file smaller.
Tuning the look
On live-action footage, strong sharpening adds white fringes along edges, shimmer in hair and more visible noise in the shadows. Export a short section with unsharp=5:5:0.5:5:5:0.0 first, and raise la to 0.8 or 1.0 only if it needs more. Footage that a phone has already sharpened gets black-and-white halos around thin lines when you sharpen it again. Check for them at 100% zoom on text, hair and building edges, not in a preview scaled to fit the window.
In a filter chain, sharpen last: after scaling, noise reduction and color work, right before encoding. If you sharpen first, a later resize resamples the sharpened edges. On noisy footage, run a light hqdn3d (noise reduction) before a weak unsharp; both the picture and the file size come out steadier. Sharpening strengthens edges that are already there. It cannot fix an out-of-focus shot.