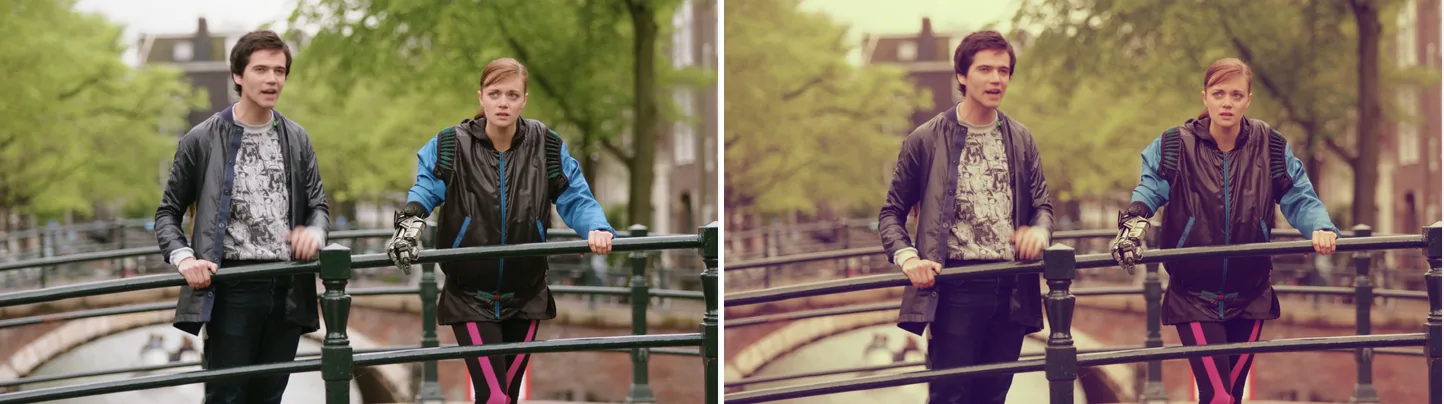
Left is the original. Right is the same frame with curves=preset=vintage, a single preset.
Source: Tears of Steel (CC) Blender Foundation | mango.blender.org, CC BY 3.0. One frame of the film, processed with the filter shown.
Basic Commands
Boost Contrast with the Master Curve (S-Curve)
ffmpeg -i input.mp4 -vf "curves=master='0/0 0.25/0.15 0.5/0.5 0.75/0.85 1/1'" -pix_fmt yuv420p output.mp4master is one curve applied to the red, green and blue channels together. Each pair such as 0/0 is a control point written as input value/output value: a point the curve passes through. This example lowers the dark tones and raises the bright ones. That S-shaped curve increases contrast. For a quick brightness or contrast change, the eq filter is simpler. curves works in RGB, so without -pix_fmt yuv420p the H.264 output is 4:4:4, which many players and devices cannot play.
Adjust the Red Channel Only
ffmpeg -i input.mp4 -vf "curves=red='0/0 0.5/0.6 1/1'" -pix_fmt yuv420p output.mp4red, green and blue set a separate curve for each channel. This example raises only the red midtones.
Use a Built-in Preset
ffmpeg -i input.mp4 -vf "curves=preset=vintage" -pix_fmt yuv420p output.mp4preset accepts the names in the table below.
List of Built-in Presets
| Preset Name | Description |
|---|---|
none |
No change (default) |
color_negative |
Negative inversion |
cross_process |
Cross-process look |
darker |
Darkens the whole image |
increase_contrast |
Contrast enhancement |
lighter |
Brightens the whole image |
linear_contrast |
Linear contrast |
medium_contrast |
Medium contrast |
negative |
Negative |
strong_contrast |
Strong contrast |
vintage |
Vintage look |
ffmpeg -i input.mp4 -vf "curves=preset=cross_process" -pix_fmt yuv420p output.mp4How to Write Control Points
Write each control point as input value/output value and separate the points with spaces. Values run from 0.0 (darkest) to 1.0 (brightest).
master='0/0 0.5/0.7 1/1'0/0— black (input 0 → output 0)0.5/0.7— raises the midtones1/1— white (input 1 → output 1)
FFmpeg joins the points with a smooth curve (spline interpolation). More points give you finer control.
Combining Individual RGB Curves
ffmpeg -i input.mp4 \
  -vf "curves=red='0/0 1/0.9':green='0/0 1/0.95':blue='0/0 0.8/1 1/1'" -pix_fmt yuv420p \
  output.mp4
This lowers the red and green highlights slightly and lifts the blue, which gives the whole image a cooler, bluer look. To shift the hue itself, combine it with the hue filter.
Combining a Preset with the Master Curve
ffmpeg -i input.mp4 \
  -vf "curves=preset=vintage:master='0/0 0.5/0.55 1/1'" -pix_fmt yuv420p \
  output.mp4
vintage sets the overall look, and master adjusts the brightness on top of it.
Applying to Still Images
ffmpeg -i input.jpg -vf "curves=preset=increase_contrast" output.jpgBad Example
Bad example: control points are not in ascending order
ffmpeg -i input.mp4 -vf "curves=master='0/0 0.8/0.3 0.5/0.7 1/1'" output.mp4
List the points so that the input values (the left-hand numbers) go from small to large. When they are out of order, as here, FFmpeg stops with an error that ends in not strictly increasing on the x-axis.
Caveats
curvesworks in RGB. YUV video is converted to RGB automatically.- You can give a single control point. Below the first point and above the last one, the curve stays flat at that point’s output value, so with one point the whole image becomes a single value. To shape the full range, include the end points
0/…and1/…. - If you add
red,green,blueormasterto apreset, your curve replaces the preset’s curve for that channel. Presets made only of amastercurve, such asincrease_contrastandlighter, have no effect once you addmaster.
Measured: time and size
This is the command that was measured:
ffmpeg -i input.mp4 -vf curves=preset=increase_contrast -c:v libx264 -crf 23 -preset medium -an output.mp4| Measured | |
|---|---|
| Wall-clock time | 42.01 s (2.86x real time) |
| Output size | 97.79 MB |
| Size vs baseline | +13.4% |
| For reference: re-encode with no filter | 27.97 s / 86.26 MB |
Rig: Core i9-14900KF (32 threads), FFmpeg 8.1 (gyan.dev). Source: 1920x1080, 30 fps, 120 s, 351.4 MB (Big Buck Bunny, looped, CC BY 3.0). Measured 2026-09-05, one command at a time. The raw numbers are in the dataset.
Reading the numbers
Re-encoding the same clip with the same x264 settings and no filter takes 27.97 s. The measured command has no -pix_fmt, so it wrote 4:4:4 (yuv444p), while the no-filter re-encode wrote 4:2:0 (yuv420p). 4:4:4 keeps colour at full resolution, so x264 has twice as many values to encode in each frame as with 4:2:0. That larger encode is a large part of the extra 14 seconds. The rest is the conversion to RGB and back, and the curve itself.
The 120-second source finished in 42.01 s, 2.86x faster than real time.
The file grew by 13.4% because of what increase_contrast does. CRF 23 keeps the quality constant and lets the file size change. A steeper tone curve increases the contrast of edges and noise, so x264 needs more bits to keep the same quality.
Other operations timed on the same two-minute clip: a 720p downscale took 18.43 s and the no-filter re-encode 27.97 s, both faster than curves. colorbalance + eq took 53.29 s and boxblur 59.37 s, both slower. A VP9 transcode of the same clip took 729.16 s.
The bigger difference is whether the video is re-encoded at all. Operations that copy the video with -c copy or -c:v copy (no re-encoding) finished in about a second: stream mapping took 0.41 s, moving the moov atom 0.49 s, and an audio fade that re-encodes only the audio 1.03 s. Colour changes can never be that fast, because every frame has to be decoded, filtered and encoded again. When you only want to judge how a curve looks, first cut a few seconds out with -ss/-t and a stream copy, then run curves on that short clip. You can then try many more curves in the same time.
The figure is for preset=increase_contrast only; a hand-written master curve was not timed. -an drops the audio, so the 42.01 s includes no audio processing.
Start with a gentle curve, for example points at 0.25/0.2 and 0.75/0.8. Then check for crushed blacks, clipped highlights and banding in smooth skies or walls. Exporting the same frame as a PNG before and after makes the comparison easier.
Related Filters
hue— adjusts hue, saturation, and brightnesseq— adjusts brightness, contrast, and gammacolorbalance— color correction for shadows, midtones, and highlightslut3d— color grading via a 3D LUT