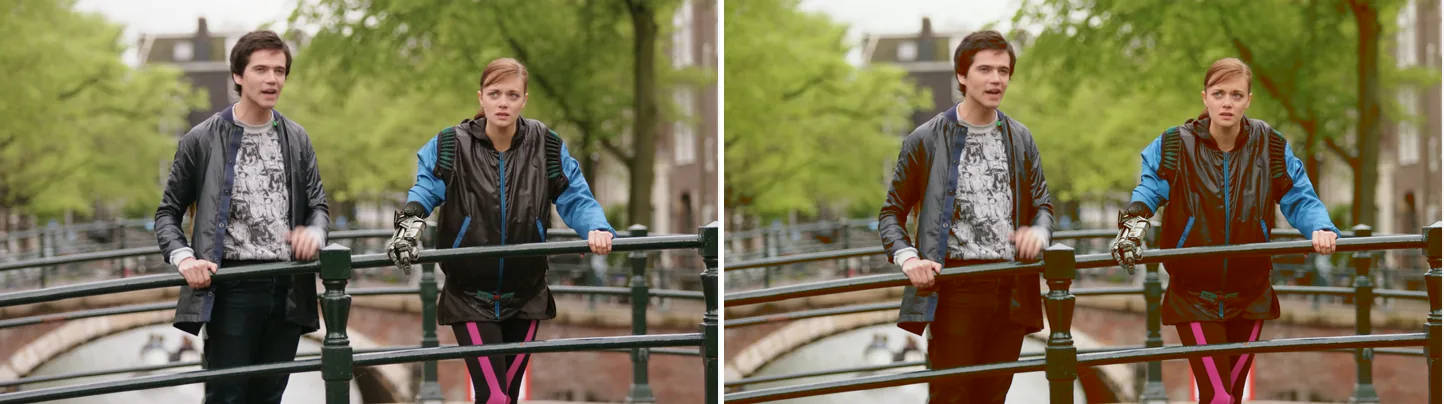
Left is the original, right is colorbalance=rs=0.3:bs=-0.3,eq=saturation=1.15. rs (red) and bs (blue) change only the shadows, so dark areas such as the jackets and trousers turn reddish and the bright areas barely change.
Source: Tears of Steel (CC) Blender Foundation | mango.blender.org, CC BY 3.0. One frame of the film, processed with the filter shown.
eq — Basic Brightness, Contrast, and Saturation Controls
eq is the simplest color filter. For each setting in more detail, see brightness, contrast and saturation with eq.
ffmpeg -i input.mp4 -vf "eq=brightness=0.1:contrast=1.2:saturation=1.3:gamma=1.0" output.mp4| Parameter | Range | Default | Description |
|---|---|---|---|
brightness |
-1.0 to 1.0 | 0 | Brightness (0 = no change) |
contrast |
-1000 to 1000 | 1 | Contrast (1 = no change) |
saturation |
0 to 3.0 | 1 | Saturation (1 = no change, 0 = grayscale) |
gamma |
0.1 to 10 | 1 | Gamma correction (1 = no change) |
Common Adjustments
Brighten slightly and boost contrast:
ffmpeg -i input.mp4 -vf "eq=brightness=0.05:contrast=1.3" output.mp4Convert to grayscale:
ffmpeg -i input.mp4 -vf "eq=saturation=0" output.mp4curves — Fine-Grained Tone Curves
curves changes each input value to an output value along a curve that you set with points. For more on points and per-channel curves, see tone curves with the curves filter. An S-shaped curve raises contrast:
ffmpeg -i input.mp4 -vf "curves=all='0/0 0.25/0.15 0.5/0.5 0.75/0.85 1/1'" -pix_fmt yuv420p output.mp4Each point is written input/output, with values from 0 to 1. all applies the curve to every color channel.
curves works on RGB pictures. Without -pix_fmt yuv420p, FFmpeg encodes the result as 4:4:4 H.264 (High 4:4:4 Predictive), which many phones, TVs and browsers cannot play. Add -pix_fmt yuv420p whenever you use curves, colorbalance or lut3d.
Per-Channel Adjustments
Lift the red channel for a warmer look:
ffmpeg -i input.mp4 -vf "curves=red='0/0 0.5/0.6 1/1'" -pix_fmt yuv420p output.mp4Lower the blue channel to reduce cool tones:
ffmpeg -i input.mp4 -vf "curves=blue='0/0 0.5/0.4 1/0.9'" -pix_fmt yuv420p output.mp4Using Presets
ffmpeg -i input.mp4 -vf "curves=preset=vintage" -pix_fmt yuv420p output.mp4The presets are none, color_negative, cross_process, darker, increase_contrast, lighter, linear_contrast, medium_contrast, negative, strong_contrast, vintage.
colorbalance — Tint Shadows / Midtones / Highlights
Shift the shadows cooler (more blue) and warm the highlights slightly:
ffmpeg -i input.mp4 -vf "colorbalance=bs=0.1:rs=-0.1:rh=0.1" -pix_fmt yuv420p output.mp4| Parameter | Description |
|---|---|
rs/gs/bs |
Red/green/blue shift in the shadows (-1 to 1) |
rm/gm/bm |
Red/green/blue shift in the midtones |
rh/gh/bh |
Red/green/blue shift in the highlights |
Combining Filters
Put several filters in one -vf, separated by commas. They run in order, here eq first and then colorbalance:
ffmpeg -i input.mp4 -vf "eq=brightness=0.05:contrast=1.1,colorbalance=rs=-0.05:bs=0.05" -pix_fmt yuv420p output.mp4Which Filter to Use
| Goal | Recommended filter |
|---|---|
| Quickly tune brightness, contrast, or saturation | eq |
| Shape tone with curves | curves |
| Independently color shadows, midtones, and highlights | colorbalance |
| Apply a .cube LUT | lut3d |
Measured: time and size
The measured command:
ffmpeg -i input.mp4 -vf colorbalance=rs=0.15:bs=-0.15,eq=saturation=1.1 -c:v libx264 -crf 23 -preset medium -an output.mp4| Measured | |
|---|---|
| Wall-clock time | 53.29 s (2.25x realtime) |
| Output size | 87.71 MB |
| Size vs. an unfiltered re-encode | +1.7% |
Test machine: Core i9-14900KF (32 threads), FFmpeg 8.1 (gyan.dev build). Source: 1920x1080, 30 fps, 120 s, 351.4 MB (Big Buck Bunny, looped, CC BY 3.0). Run on 2026-09-05, one command at a time. The comparison is the same source re-encoded with no filter: 27.97 s, 86.26 MB. The raw numbers are in the dataset.
Reading the numbers
The time depends on the filter. With no filter, the re-encode took 27.97 s. eq and hue took about the same (27.07 s and 27.06 s), curves 42.01 s, this colorbalance + eq chain 53.29 s, and boxblur 59.37 s. The curves and colorbalance runs had no -pix_fmt yuv420p, so they were encoded as 4:4:4, which is slower than 4:2:0; part of their extra time comes from that. For this chain, 120 s of video took 53.29 s: about 0.44 times the clip length, or 2.25x realtime.
The file size barely changed: +1.7%. Other colour filters can change it more. In the same run, all at the same CRF (quality setting), curves with a contrast boost came out +13.4%, hue +3.1%, and lut3d + eq with slightly lower saturation and contrast -2.4%. Raising contrast or saturation made the file larger; lowering them made it smaller. These changes range from a few percent to the low teens. If you need a smaller file, change the bitrate or the resolution, not the colour: scaling down to 720p in the same run gave -52.3%.
Colour correction cannot use -c copy. In the same run, jobs that did not re-encode the video took 0.41 s (stream mapping), 0.49 s (moving the moov atom, the MP4 index) and 1.03 s (an audio fade that copies the video and re-encodes only the audio). Colour filters change the pixels, so the video has to be re-encoded, which took 53.29 s here. Do cuts, joins and container changes separately with -c copy, and put all colour filters into one re-encode so that you pay the 53.29 s only once.
Frequently Asked Questions
Should I use eq or curves for colour correction?
Use eq to change the brightness, contrast or saturation of the whole picture. Use curves to shape the shadows, midtones and highlights separately. curves is closer to a professional grading workflow.
What is the difference between gamma and brightness?
Brightness adds the same amount to every value. Gamma bends the curve instead: above 1 it brightens the midtones, and below 1 it darkens them. Gamma usually looks more natural. It keeps only the values 0 and 255 fixed. Most video uses 16 for black and 235 for white, and gamma moves those too: gamma=2 turns 16 into 64.
Why does the corrected video look greenish?
Usually the green curve or the saturation was pushed too far. Reset that channel. Make changes to all channels together first, and adjust single channels last.
Can I apply a 3D LUT instead?
Yes. lut3d reads .cube files: ffmpeg -i in.mp4 -vf lut3d=look.cube -pix_fmt yuv420p out.mp4. A LUT (lookup table) is the standard way to share a graded look.
Does this preserve HDR colour?
Not as they are. eq converts a 10-bit HDR source to 8-bit (yuv420p) before it works. curves keeps 10 bits, but both filters treat the HDR (PQ or HLG) values as plain numbers. To keep HDR, grade in software that handles PQ and HLG, such as DaVinci Resolve. If SDR output is fine, convert to SDR first and then use these filters.